How to Build an LED Circuit and a Light-Dependent Resistor Circuit; Simple Electronics
How to Build an LED Circuit and a Light-Dependent Resistor Circuit.
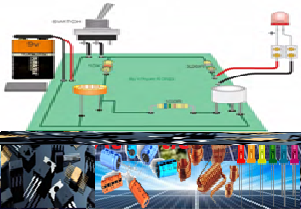
A circuit is a closed loop or pathway through which electric current flows.
It consists of components like;
- resistors,
- capacitors,
- inductors,
- and power sources connected by conductive wires or traces on a circuit board.
An LED Circuit
To build an LED circuit, the Materials needed are:
- Breadboard,
- LED (Light Emitting Diode),
- resistor (330 Ohms or appropriate value for the LED),
- 9V battery and battery clip (or a suitable power supply,
- connecting wires (jumper wires),
- multimeter (optional, for testing),
- switch (optional, to control the LED)
Procedures involved:
- Place the breadboard on a flat surface for easy component insertion.
- Place the LED on the breadboard with the positive anode (longer leg) in one row and the negative cathode (shorter leg) in another row.
- Connect one end of the resistor to the same row as the anode of the LED.
- Connect the other end of the resistor to an empty row.
- Attach the battery clip to the 9V battery.
- Connect the red wire (positive) from the battery clip to the row with the free end of the resistor.
- Connect the black wire (negative) from the battery clip to the row with the cathode of the LED.
- Insert the switch into the breadboard.
- Connect one terminal of the switch to the row with the free end of the resistor.
- Connect the other terminal of the switch to the row with the red wire from the battery clip.
- Double-check all connections.
- Connect the battery clip to the 9V battery.
- If using a switch, toggle it to the “on” position.
- Observe the LED lighting up, indicating a successful circuit.
If the LED does not light up:
- Check all connections for loose wires.
- Ensure the LED is correctly oriented (anode to positive, cathode to negative).
- Verify the resistor value is appropriate for the LED and power supply.
- Use a multimeter to check for continuity and correct voltage levels.
A Light-Dependent Resistor Circuit.
To build a light-dependent resistor circuit, the Materials needed are:
- Breadboard,
- LDR (light-dependent resistor),
- 10k Ohm resistor,
- LED, 330 Ohm resistor,
- 9V battery,
- battery clip,
- jumper wires.
Procedures involved:
- Connect one end of the LDR to the battery’s positive terminal.
- Connect the other end of the LDR to one end of the 10k Ohm resistor.
- Connect the other end of the 10k Ohm resistor to the battery’s negative terminal.
- Connect the junction of the LDR and the 10k Ohm resistor to the base of an NPN transistor (if using).
- Connect the transistor emitter to the battery’s negative terminal.
- Connect the collector of the transistor to one end of the 330 Ohm resistor.
- Connect the other end of the 330 Ohm resistor to the anode (positive terminal) of the LED.
- Connect the cathode (negative terminal) of the LED to the negative terminal of the battery.
- The LED should light up when the ambient light levels fall below a certain threshold.