How to Preserve End-of-Season Crops Without Refrigerators, Drying, or Canning Technologies. (ROOTS CELLARING)

How to Preserve End-of-Season Crops Without Refrigerators, Drying, or Canning Technologies. (ROOTS CELLARING)
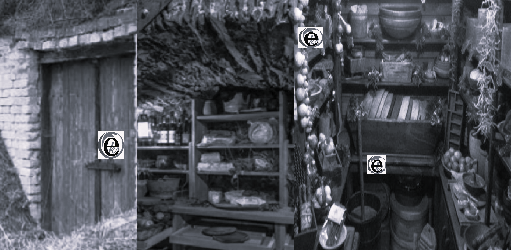
Once upon a time, before refrigerators and canning technology were invented, people relied on root cellars to store end-of-the-season crops.
Root cellaring is still an effective and energy-efficient way to store hearty fruits and vegetables.
A root cellar is a space typically underground but at the very least protected from the elements that maintain a temperature between 35 and 50°F.
In other words, well above freezing, but never warm: refrigerator temperatures.
Although commonly called root cellars, these cool temperature storage areas are not only useful for root vegetables.
They are also good for storing hearty produce such as cabbage and cauliflower, as well as some types of tree fruit (especially apples and pears, but also quinces, citrus, and others).
-
Types of Roots Cellar
What they all have in common is that they take care of the four essentials of cold storage: temperature, humidity, ventilation, and darkness.
Traditional root cellar designs were sometimes extremely simple: just deep holes dug in the ground with a pipe or tunnel for ventilation and earth or straw piled on top of the food in the hole.
A dirt floor was (and still is) the preferred bottom surface of the cellar, although modern root cellars are often floored with concrete.
By the way, most modern basements are far too warm to be used as root cellars unless you wall off a corner and add vents near the bottom and the top that lead directly to the outside air.
-
The Container Cellar
This is a basic but highly effective way to build a root cellar using nothing more than a piece of pipe and a garbage can, or any other large, waterproof container (old stand-alone freezers and wooden barrels work great).
It is great for preserving both root vegetables and storage variety apples, but remember not to store them together (the apples could cause the veggies to spoil).
How it is Done
- Start by digging a hole 2 to 4 inches wider than the width of your container and 6 inches deeper than the container’s depth.
- Set the container into the hole, lid ends up.
- Drill a hole in the lid large enough to hold a
- Fill the space between the container and the sides of the hole with dirt, using a long stick or shovel handle to pack the dirt down firmly.
- Put a thick layer of straw at the bottom of the container, then start layering in your vegetables alternating each layer of food with a layer of
- Try to spread the food out so that none of the pieces are
- When the container is two-thirds full, add a pipe to the center sticking straight up, and continue layering in food and straw, working around the pipe.
- Finish with a layer of straw.
- The pipe must be long enough to reach a third of the way down into the layers of food and straw and stick out above the covered root cellar by at least 3 to 4 inches.
- Put on the lid with the pipe sticking up through it.
- Cut two or more pieces of 2-inch-thick extruded polystyrene foam big enough to cover the lid plus an inch beyond its perimeter.
- Do not cover the pipe.
- Cut a piece of plywood to approximately the same size as the expanse of the foam pieces.
- Cut out a hole for the pipe in the center of the plywood.
- Fit the plywood over the pipe and weigh it down with a few
-
The Clamp Root Cellar
This may very well be the original cold storage design.
It’s one that’s been used for many centuries.
It’s just an insulated pile of root vegetables with some consideration given to ventilation.
A clamp is basic, but it gets the job done in all but the coldest winter areas.
Any root vegetable that is a candidate for cold storage may be “clamped.”
Removing damaged vegetables is always important for cold storage, but especially so for this method in which the vegetables will be heaped one on top of the other.
Also remove any especially small vegetables, which are likely to wither in a clamp.
How it is Done
- Lay out a 9-inch-deep layer of straw directly on outdoor soil in an oblong area several feet
- Pile your sorted produce on top of the straw steeply, ending up with a heap around 45 inches high, give or take.
- As you lay out the base of the pile of root vegetables, work in horizontal straw tunnels that penetrate the heap and extend slightly beyond it.
- There should be at least one straw tunnel for every 2 feet (horizontally) of clamp.
- These tunnels should be at the bottom of the root vegetable heap.
- Additionally, create vertical straw chimneys at 2-feet intervals along the top of the vegetable heap.
- The straw tunnels and chimneys will vent gases and excess moisture from the pile of stored
- Cover the entire mound with another 5 to 6 inches of straw, then cover that with 4 to 6 inches of soil.
- Take care to leave the ends of the straw tunnels and chimneys uncovered so that air can circulate through them.
- Pack the soil layer down firmly with your hands or the back of a shovel.
- Measure the 5 to 6 inches after you’ve compacted the soil.
- Place flat rocks or heavy boards over the straw chimneys.
- So that, air will still be able to escape them, but rain won’t be able to get in.
- When it’s time to retrieve some of the food stored in your clamp, choose one spot near the ground on the side of the
- Use a hand tool such as a trowel to burrow through the outer soil and straw
- Reach in and take out what you need from the vegetable pile.
- Fill in the hole you’ve made with additional straw, and cover that, as before, with 4 to 6 inches of compacted soil.


